看完了Stable Diffusion的论文,在最后这篇文章里,我们来学习Stable Diffusion的代码实现。具体来说,我们会学习Stable Diffusion官方仓库及Diffusers开源库中有关采样算法和U-Net的代码,而不会学习有关训练、VAE、text encoder (CLIP) 的代码。如今大多数工作都只会用到预训练的Stable Diffusion,只学采样算法和U-Net代码就能理解大多数工作了。
建议读者在阅读本文之前了解DDPM、ResNet、U-Net、Transformer。
本文用到的Stable Diffusion版本是v1.5。Diffusers版本是0.25.0。为了提升可读性,本文对源代码做了一定的精简,部分不会运行到的分支会被略过。
算法梳理
在正式读代码之前,我们先用伪代码梳理一下Stable Diffusion的采样过程,并回顾一下U-Net架构的组成。实现Stable Diffusion的代码库有很多,各个库之间的API差异很大。但是,它们实际上都是在描述同一个算法,同一个模型。如果我们理解了算法和模型本身,就可以在学习时主动去找一个算法对应哪一段代码,而不是被动地去理解每一行代码在干什么。
LDM 采样算法
让我们从最早的DDPM开始,一步一步还原Latent Diffusion Model (LDM)的采样算法。DDPM的采样算法如下所示:1
2
3
4
5
6
7
8
9
10def ddpm_sample(image_shape):
ddpm_scheduler = DDPMScheduler()
unet = UNet()
xt = randn(image_shape)
T = 1000
for t in T ... 1:
eps = unet(xt, t)
std = ddpm_scheduler.get_std(t)
xt = ddpm_scheduler.get_xt_prev(xt, t, eps, std)
return xt
在DDPM的实现中,一般会有一个类专门维护扩散模型的$\alpha, \beta$等变量。我们这里把这个类称为DDPMScheduler。此外,DDPM会用到一个U-Net神经网络unet,用于计算去噪过程中图像应该去除的噪声eps。准备好这两个变量后,就可以用randn()从标准正态分布中采样一个纯噪声图像xt。它会被逐渐去噪,最终变成一幅图片。去噪过程中,时刻t会从总时刻T遍历至1(总时刻T一般取1000)。在每一轮去噪步骤中,U-Net会根据这一时刻的图像xt和当前时间戳t估计出此刻应去除的噪声eps,根据xt和eps就能知道下一步图像的均值。除了均值,我们还要获取下一步图像的方差,这一般可以从DDPM调度类中直接获取。有了下一步图像的均值和方差,我们根据DDPM的公式,就能采样出下一步的图像。反复执行去噪循环,xt会从纯噪声图像变成一幅有意义的图像。
DDIM对DDPM的采样过程做了两点改进:1) 去噪的有效步数可以少于T步,由另一个变量ddim_steps决定;2) 采样的方差大小可以由eta决定。因此,改进后的DDIM算法可以写成这样:1
2
3
4
5
6
7
8
9
10
11def ddim_sample(image_shape, ddim_steps = 20, eta = 0):
ddim_scheduler = DDIMScheduler()
unet = UNet()
xt = randn(image_shape)
T = 1000
timesteps = ddim_scheduler.get_timesteps(T, ddim_steps) # [1000, 950, 900, ...]
for t in timesteps:
eps = unet(xt, t)
std = ddim_scheduler.get_std(t, eta)
xt = ddim_scheduler.get_xt_prev(xt, t, eps, std)
return xt
其中,ddim_steps是去噪循环的执行次数。根据ddim_steps,DDIM调度器可以生成所有被使用到的t。比如对于T=1000, ddim_steps=20,被使用到的就只有[1000, 950, 900, ..., 50]这20个时间戳,其他时间戳就可以跳过不算了。eta会被用来计算方差,一般这个值都会设成0。
DDIM是早期的加速扩散模型采样的算法。如今有许多比DDIM更好的采样方法,但它们多数都保留了
steps和eta这两个参数。因此,在使用所有采样方法时,我们可以不用关心实现细节,只关注多出来的这两个参数。
在DDIM的基础上,LDM从生成像素空间上的图像变为生成隐空间上的图像。隐空间图像需要再做一次解码才能变回真实图像。从代码上来看,使用LDM后,只需要多准备一个VAE,并对最后的隐空间图像zt解码。1
2
3
4
5
6
7
8
9
10
11
12
13def ldm_ddim_sample(image_shape, ddim_steps = 20, eta = 0):
ddim_scheduler = DDIMScheduler()
vae = VAE()
unet = UNet()
zt = randn(image_shape)
T = 1000
timesteps = ddim_scheduler.get_timesteps(T, ddim_steps) # [1000, 950, 900, ...]
for t in timesteps:
eps = unet(zt, t)
std = ddim_scheduler.get_std(t, eta)
zt = ddim_scheduler.get_xt_prev(zt, t, eps, std)
xt = vae.decoder.decode(zt)
return xt
而想用LDM实现文生图,则需要给一个额外的文本输入text。文本编码器会把文本编码成张量c,输入进unet。其他地方的实现都和之前的LDM一样。1
2
3
4
5
6
7
8
9
10
11
12
13
14
15
16
17def ldm_text_to_image(image_shape, text, ddim_steps = 20, eta = 0):
ddim_scheduler = DDIMScheduler()
vae = VAE()
unet = UNet()
zt = randn(image_shape)
T = 1000
timesteps = ddim_scheduler.get_timesteps(T, ddim_steps) # [1000, 950, 900, ...]
text_encoder = CLIP()
c = text_encoder.encode(text)
for t = timesteps:
eps = unet(zt, t, c)
std = ddim_scheduler.get_std(t, eta)
zt = ddim_scheduler.get_xt_prev(zt, t, eps, std)
xt = vae.decoder.decode(zt)
return xt
最后这个能实现文生图的LDM就是我们熟悉的Stable Diffusion。Stable Diffusion的采样算法看上去比较复杂,但如果能够从DDPM开始把各个功能都拆开来看,理解起来就不是那么困难了。
U-Net 结构组成
Stable Diffusion代码实现中的另一个重点是去噪网络U-Net的实现。仿照上一节的学习方法,我们来逐步学习Stable Diffusion中的U-Net是怎么从最经典的纯卷积U-Net逐渐发展而来的。
最早的U-Net的结构如下图所示:
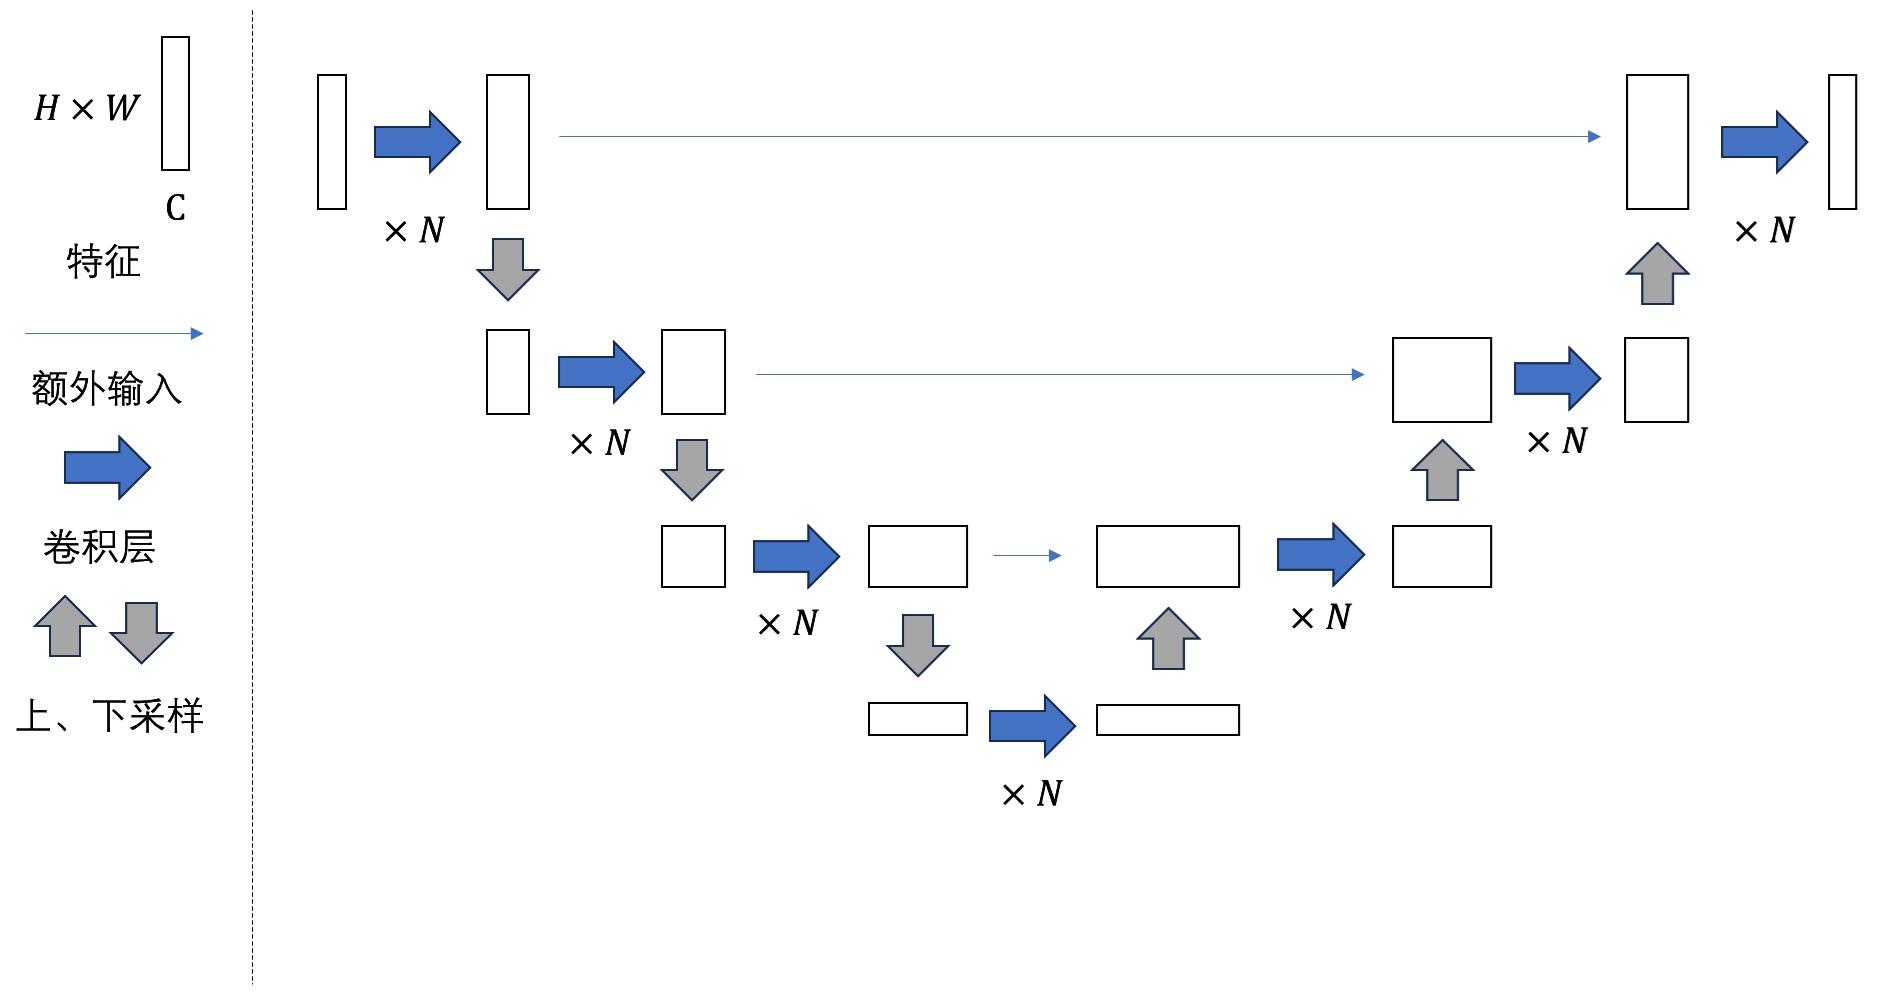
可以看出,U-Net的结构有以下特点:
- 整体上看,U-Net由若干个大层组成。特征在每一大层会被下采样成尺寸更小的特征,再被上采样回原尺寸的特征。整个网络构成一个U形结构。
- 下采样后,特征的通道数会变多。一般情况下,每次下采样后图像尺寸减半,通道数翻倍。上采样过程则反之。
- 为了防止信息在下采样的过程中丢失,U-Net每一大层在下采样前的输出会作为额外输入拼接到每一大层上采样前的输入上。这种数据连接方式类似于ResNet中的「短路连接」。
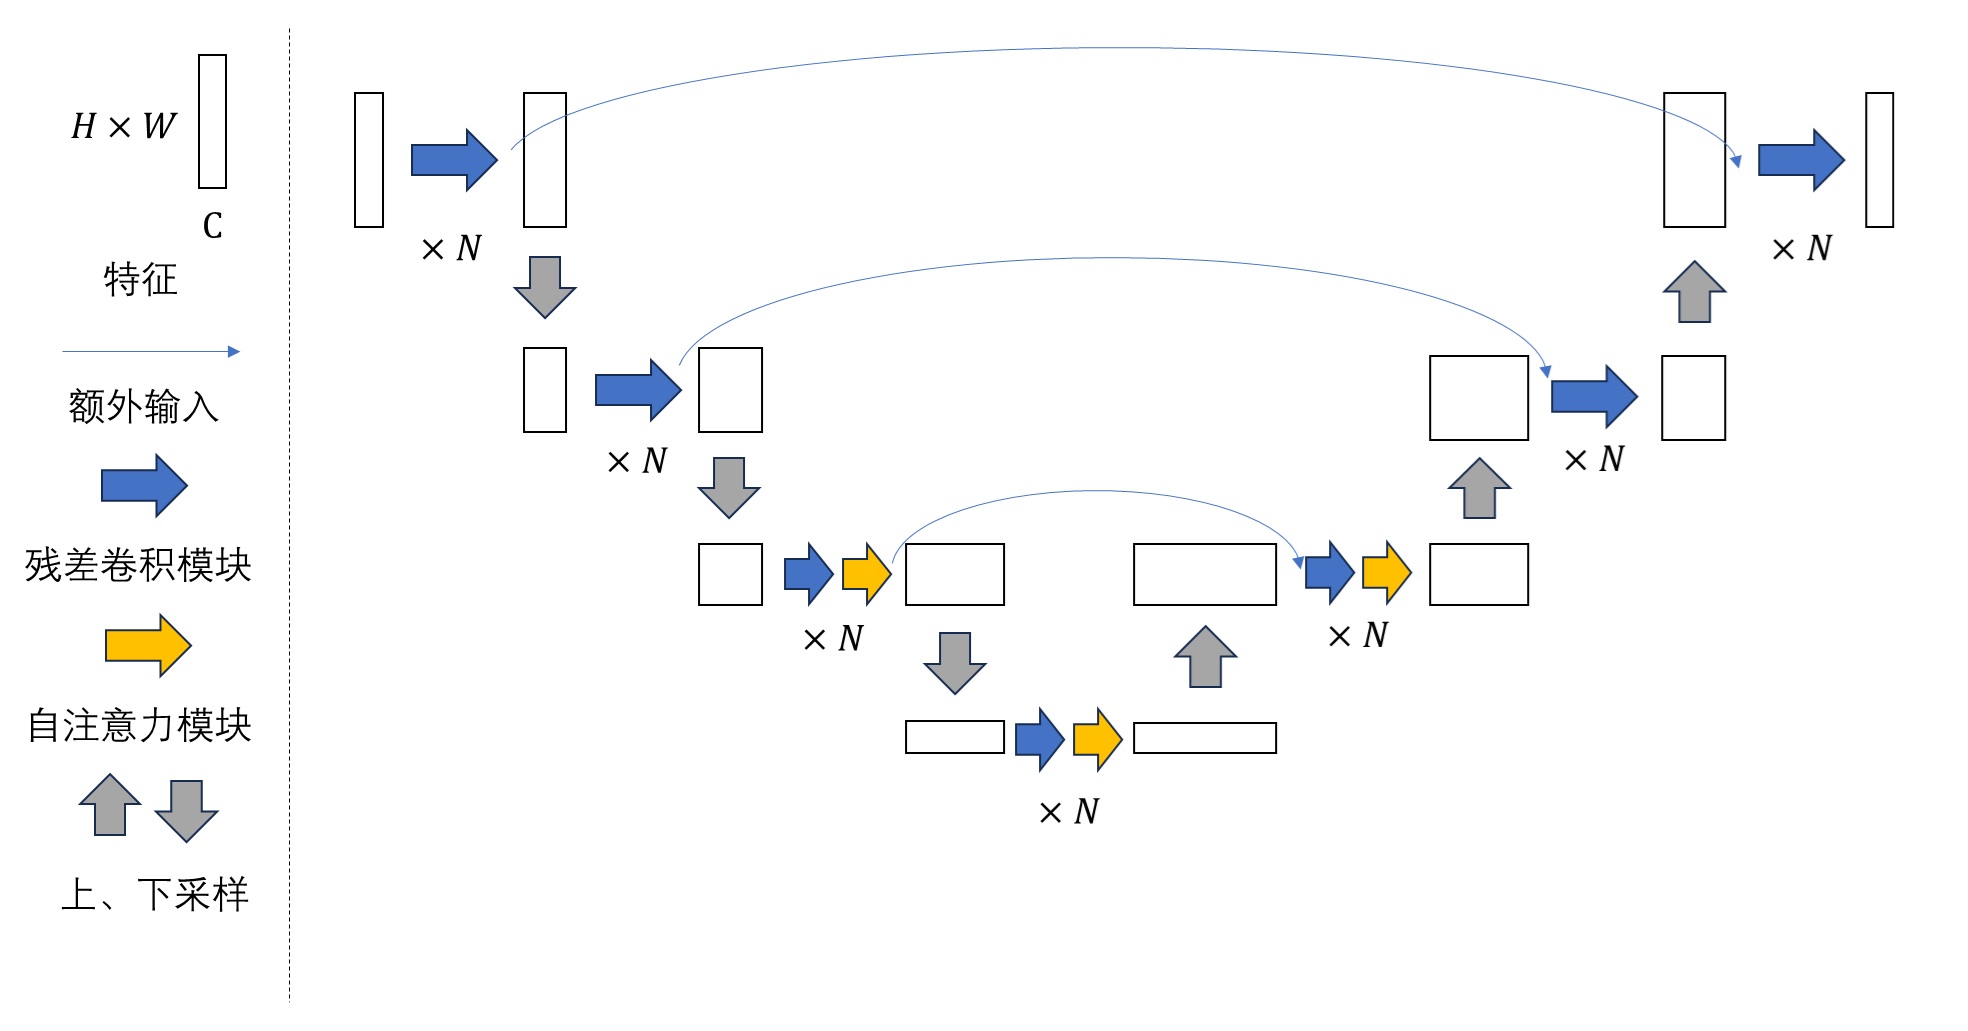
DDPM则使用了一种改进版的U-Net。改进主要有两点:
- 原来的卷积层被替换成了ResNet中的残差卷积模块。每一大层有若干个这样的子模块。对于较深的大层,残差卷积模块后面还会接一个自注意力模块。
- 原来模型每一大层只有一个短路连接。现在每个大层下采样部分的每个子模块的输出都会额外输入到其对称的上采样部分的子模块上。直观上来看,就是短路连接更多了一点,输入信息更不容易在下采样过程中丢失。
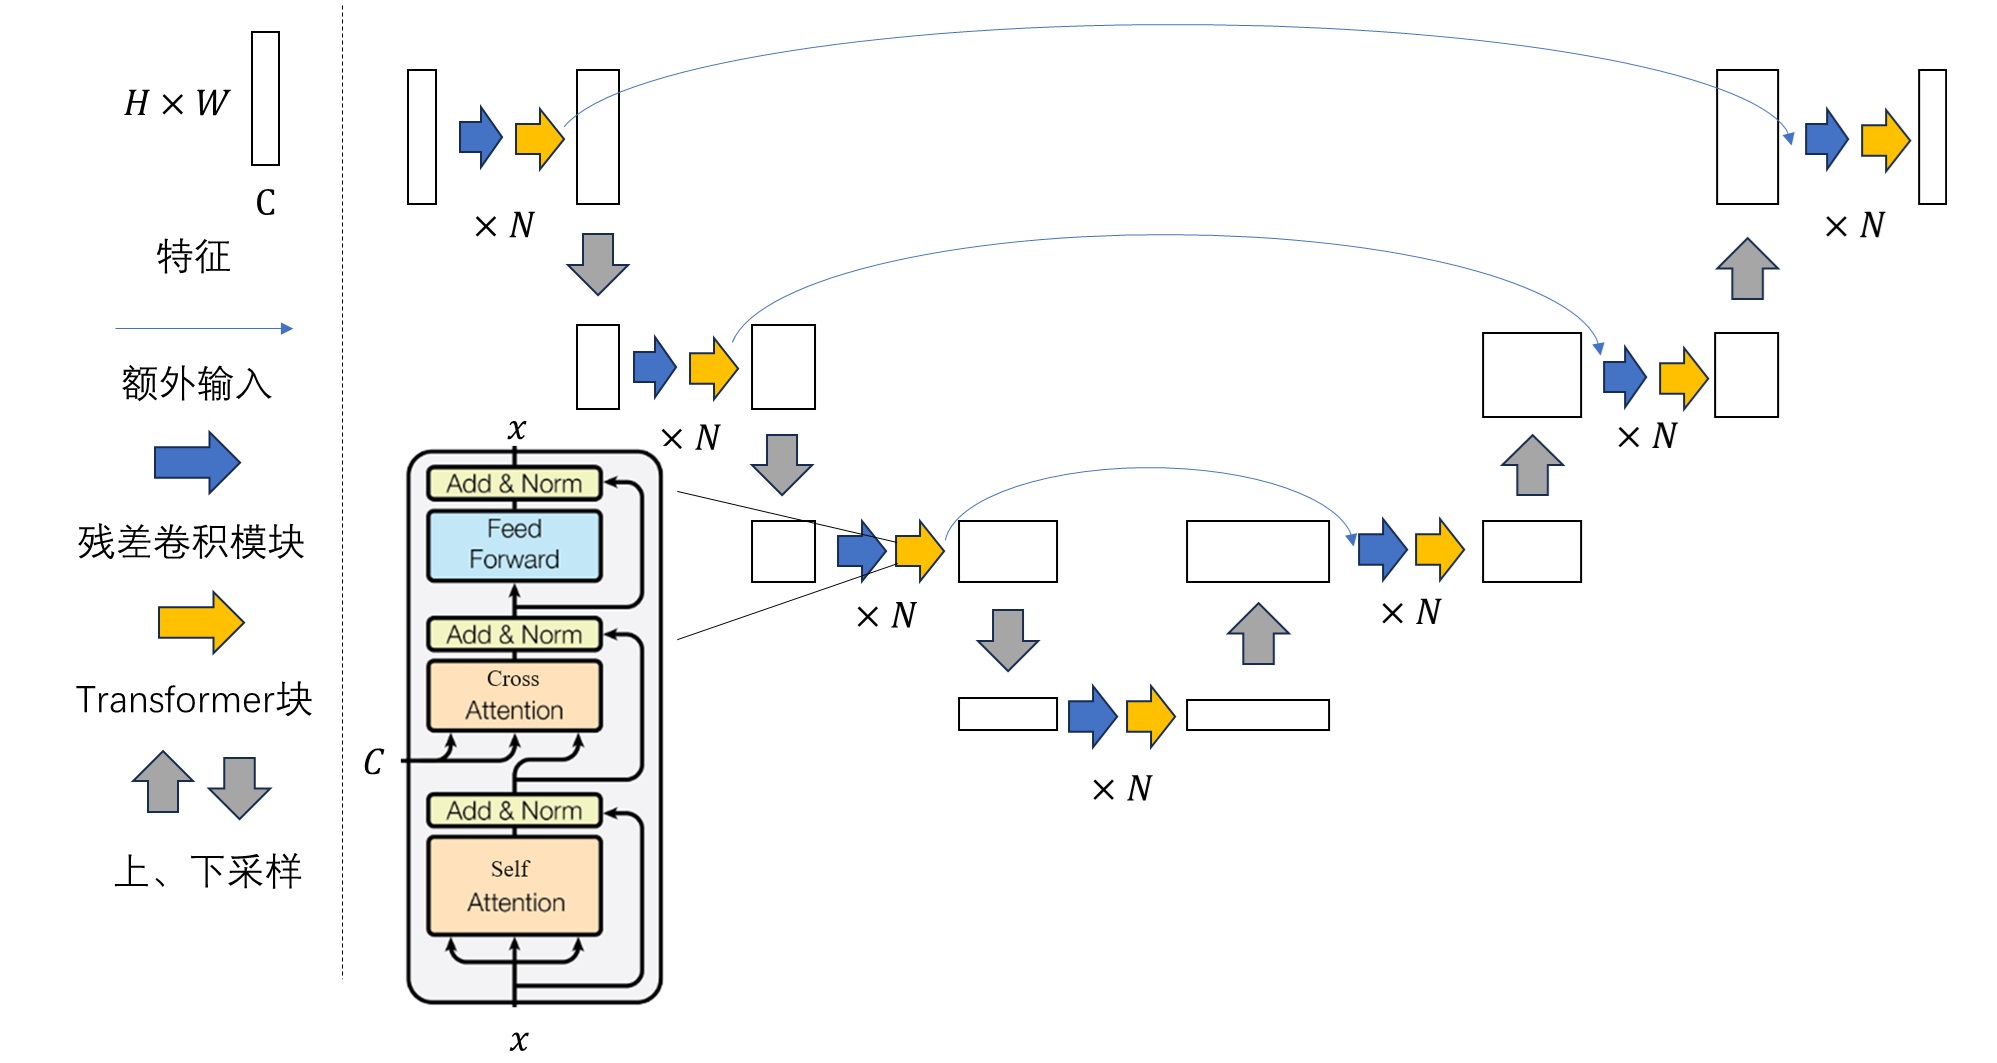
最后,LDM提出了一种给U-Net添加额外约束信息的方法:把U-Net中的自注意力模块换成交叉注意力模块。具体来说,DDPM的U-Net的自注意力模块被换成了标准的Transformer模块。约束信息$C$可以作为Cross Attention的K, V输入进模块中。
Stable Diffusion的U-Net还在结构上有少许修改,该U-Net的每一大层都有Transformer块,而不是只有较深的大层有。
至此,我们已经学完了Stable Diffusion的采样原理和U-Net结构。接下来我们来看一看它们在不同框架下的代码实现。
Stable Diffusion 官方 GitHub 仓库
安装
克隆仓库后,照着官方Markdown文档安装即可。
1 | git clone git@github.com:CompVis/stable-diffusion.git |
先用下面的命令创建conda环境,此后ldm环境就是运行Stable Diffusiion的conda环境。
1 | conda env create -f environment.yaml |
之后去网上下一个Stable Diffusion的模型文件。比较常见一个版本是v1.5,该模型在Hugging Face上:https://huggingface.co/runwayml/stable-diffusion-v1-5 (推荐下载v1-5-pruned.ckpt)。下载完毕后,把模型软链接到指定位置。
1 | mkdir -p models/ldm/stable-diffusion-v1/ |
准备完毕后,只要输入下面的命令,就可以生成实现文生图了。
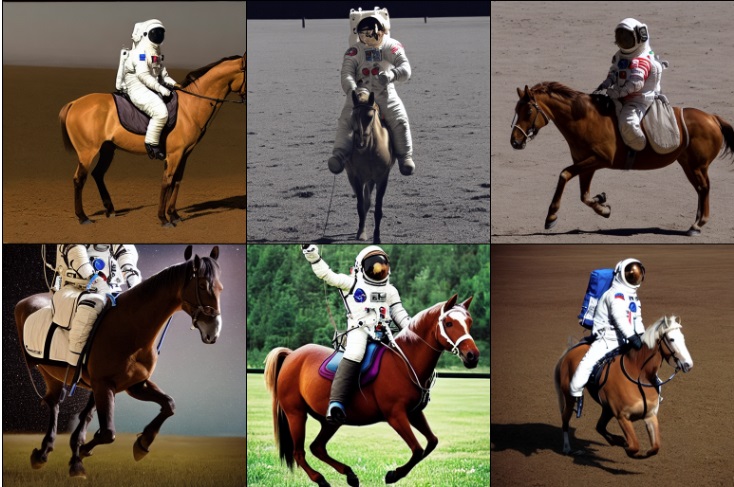
1 | python scripts/txt2img.py --prompt "a photograph of an astronaut riding a horse" |
在默认的参数下,“一幅骑着马的飞行员的照片”的绘制结果会被保存在outputs/txt2img-samples中。你也可以通过--outdir <dir>参数来指定输出到的文件夹。我得到的一些绘制结果为:
如果你在安装时碰到了错误,可以在搜索引擎上或者GitHub的issue里搜索,一般都能搜到其他人遇到的相同错误。
主函数
接下来,我们来探究一下scripts/txt2img.py的执行过程。为了方便阅读,我们可以简化代码中的命令行处理,得到下面这份精简代码。(你可以把这份代码复制到仓库根目录下的一个新Python脚本里并直接运行。别忘了修改代码中的模型路径)
1 | import os |
抛开前面一大堆初始化操作,代码的核心部分只有下面几行。
1 | uc = None |
我们来逐行分析一下这段代码。一开始的几行是执行Classifier-Free Guidance (CFG)。uc表示的是CFG中的无约束下的约束张量。scale表示的是执行CFG的程度,scale不等于1.0即表示启用CFG。model.get_learned_conditioning表示用CLIP把文本编码成张量。对于文本约束的模型,无约束其实就是输入文本为空字符串("")。因此,在代码中,若启用了CFG,则会用CLIP编码空字符串,编码结果为uc。
如果你没学过CFG,也不用担心。你可以暂时不要去理解上面这段话。等读完了后文中有关CFG的代码后,你差不多就能理解CFG的用法了。
1 | uc = None |
之后的几行是在把用户输入的文本编码成张量。同样,model.get_learned_conditioning表示用CLIP把输入文本编码成张量c。1
2
3if isinstance(prompts, tuple):
prompts = list(prompts)
c = model.get_learned_conditioning(prompts)
接着是用扩散模型的采样器生成图片。在这份代码中,sampler是DDIM采样器,sampler.sample函数直接完成了图像生成。
1 | shape = [C, H // f, W // f] |
最后,LDM生成的隐空间图片被VAE解码成真实图片。函数model.decode_first_stage负责图片解码。x_samples_ddim在后续的代码中会被后处理成正确格式的RGB图片,并输出至文件里。
1 | x_samples_ddim = model.decode_first_stage(samples_ddim) |
Stable Diffusion 官方实现的主函数主要就做了这些事情。这份实现还是有一些凌乱的。采样算法的一部分内容被扔到了主函数里,另一部分放到了DDIM采样器里。在阅读官方实现的源码时,既要去读主函数里的内容,也要去读采样器里的内容。
接下来,我们来看一看DDIM采样器的部分代码,学完采样算法的剩余部分的实现。
DDIM 采样器
回头看主函数的前半部分,DDIM采样器是在下面的代码里导入的:1
from ldm.models.diffusion.ddim import DDIMSampler
跳转到ldm/models/diffusion/ddim.py文件,我们可以找到DDIMSampler类的实现。
先看一下这个类的构造函数。构造函数主要是把U-Net model给存了下来。后文中的self.model都指的是U-Net。1
2
3
4
5
6
7
8
9
10
11
12def __init__(self, model, schedule="linear", **kwargs):
super().__init__()
self.model = model
self.ddpm_num_timesteps = model.num_timesteps
self.schedule = schedule
# in main
config = OmegaConf.load(config)
model = load_model_from_config(config, ckpt)
model = model.to(device)
sampler = DDIMSampler(model)
再沿着类的self.sample方法,看一下DDIM采样的实现代码。以下是self.sample方法的主要内容。这个方法其实就执行了一个self.make_schedule,之后把所有参数原封不动地传到了self.ddim_sampling里。
1 |
|
self.make_schedule用于预处理扩散模型的中间计算参数。它的大部分实现细节可以略过。DDIM用到的有效时间戳列表就是在这个函数里设置的,该列表通过make_ddim_timesteps获取,并保存在self.ddim_timesteps中。此外,由ddim_eta决定的扩散模型的方差也是在这个方法里设置的。大致扫完这个方法后,我们可以直接跳到self.ddim_sampling的代码。
1 | def make_schedule(self, ddim_num_steps, ddim_discretize="uniform", ddim_eta=0., verbose=True): |
穿越重重的嵌套,我们总算能看到DDIM采样的实现方法self.ddim_sampling了。它的主要内容如下所示:
1 |
|
这段代码和我们之前自己写的伪代码非常相似。一开始,方法获取了在make_schedule里初始化的DDIM有效时间戳列表self.ddim_timesteps,并预处理成一个iterator。该迭代器用于控制DDIM去噪循环。每一轮循环会根据当前时刻的图像img和时间戳ts计算下一步的图像img。具体来说,代码每次用当前的时间戳step创建一个内容全部为step,形状为(b,)的张量ts。该张量会和当前的隐空间图像img,约束信息张量cond一起传给执行一轮DDIM去噪的p_sample_ddim方法。p_sample_ddim方法会返回下一步的图像img。最后,经过多次去噪后,ddim_sampling方法将去噪后的隐空间图像img返回。
p_sample_ddim里的p_sample看上去似乎意义不明,实际上这个叫法来自于DDPM论文。在DDPM论文中,扩散模型的前向过程用字母$q$表示,反向过程用字母$p$表示。因此,反向过程的一轮去噪在代码里被叫做p_sample。
最后来看一下p_sample_ddim这个方法,它的主体部分如下:
1 |
|
方法的内容大致可以拆成三段:首先,方法调用U-Net self.model,使用CFG来计算除这一轮该去掉的噪声e_t。然后,方法预处理出DDIM的中间变量。最后,方法根据DDIM的公式,计算出这一轮去噪后的图片x_prev。我们着重看第一部分的代码。
不启用CFG时,方法直接通过self.model.apply_model(x, t, c)调用U-Net,算出这一轮的噪声e_t。而想启用CFG,需要输入空字符串的约束张量unconditional_conditioning,且CFG的强度unconditional_guidance_scale不为1。CFG的执行过程是:对U-Net输入不同的约束c,先用空字符串约束得到一个预测噪声e_t_uncond,再用输入的文本约束得到一个预测噪声e_t。之后令e_t = et_uncond + scale * (e_t - e_t_uncond)。scale大于1,即表明我们希望预测噪声更加靠近有输入文本的那一个。直观上来看,scale越大,最后生成的图片越符合输入文本,越偏离空文本。下面这段代码正是实现了上述这段逻辑,只不过代码使用了一些数据拼接技巧,让空字符串约束下和输入文本约束下的结果在一次U-Net推理中获得。1
2
3
4
5
6
7
8if unconditional_conditioning is None or unconditional_guidance_scale == 1.:
e_t = self.model.apply_model(x, t, c)
else:
x_in = torch.cat([x] * 2)
t_in = torch.cat([t] * 2)
c_in = torch.cat([unconditional_conditioning, c])
e_t_uncond, e_t = self.model.apply_model(x_in, t_in, c_in).chunk(2)
e_t = e_t_uncond + unconditional_guidance_scale * (e_t - e_t_uncond)
p_sample_ddim 方法的后续代码都是在实现下面这个DDIM采样公式。代码工工整整地计算了公式中的predicted_x0, dir_xt, noise,非常易懂,没有需要特别注意的地方。

我们已经看完了p_sample_ddim的代码。该方法可以实现一步去噪操作。多次调用该方法去噪后,我们就能得到生成的隐空间图片。该图片会被返回到main函数里,被VAE的解码器解码成普通图片。至此,我们就学完了Stable Diffusion官方仓库的采样代码。
对照下面这份我们之前写的伪代码,我们再来梳理一下Stable Diffusion官方仓库的代码逻辑。官方仓库的采样代码一部分在main函数里,另一部分在ldm/models/diffusion/ddim.py里。main函数主要完成了编码约束文字、解码隐空间图像这两件事。剩下的DDIM采样以及各种Diffusion图像编辑功能都是在ldm/models/diffusion/ddim.py文件中实现的。
1 | def ldm_text_to_image(image_shape, text, ddim_steps = 20, eta = 0) |
在学习代码时,要着重学习DDIM采样器部分的代码。大部分基于Diffusion的图像编辑技术都是在DDIM采样的中间步骤中做文章,只要学懂了DDIM采样的代码,学相关图像编辑技术就会非常轻松。除此之外,和LDM相关的文字约束编码、隐空间图像编码解码的接口函数也需要熟悉,不少技术会调用到这几项功能。
还有一些Diffusion相关工作会涉及U-Net的修改。接下来,我们就来看Stable Diffusion官方仓库中U-Net的实现。
U-Net
我们来回头看一下main函数和DDIM采样中U-Net的调用逻辑。和U-Net有关的代码如下所示。LDM模型类 model在主函数中通过load_model_from_config从配置文件里创建,随后成为了sampler的成员变量。在DDIM去噪循环中,LDM模型里的U-Net会在self.model.apply_model方法里被调用。
1 | # main.py |
为了知道U-Net是在哪个类里定义的,我们需要打开配置文件 configs/stable-diffusion/v1-inference.yaml。该配置文件有这样一段话:1
2
3
4
5
6model:
target: ldm.models.diffusion.ddpm.LatentDiffusion
params:
conditioning_key: crossattn
unet_config:
target: ldm.modules.diffusionmodules.openaimodel.UNetModel
根据这段话,我们知道LDM类定义在ldm/models/diffusion/ddpm.py的LatentDiffusion里,U-Net类定义在ldm/modules/diffusionmodules/openaimodel.py的UNetModel里。一个LDM类有一个U-Net类的实例。我们先简单看一看LatentDiffusion类的实现。
ldm/models/diffusion/ddpm.py原本来自DDPM论文的官方仓库,内含DDPM类的实现。DDPM类维护了扩散模型公式里的一些变量,同时维护了U-Net类的实例。LDM的作者基于之前DDPM的代码进行开发,定义了一个继承自DDPM的LatentDiffusion类。除了DDPM本身的功能外,LatentDiffusion还维护了VAE(self.first_stage_model),CLIP(self.cond_stage_model)。也就是说,LatentDiffusion主要维护了扩散模型中间变量、U-Net、VAE、CLIP这四类信息。这样,所有带参数的模型都在LatentDiffusion里,我们可以从一个checkpoint文件中读取所有的模型的参数。相关代码定义代码如下:
把所有模型定义在一起有好处也有坏处。好处在于,用户想使用Stable Diffusion时,只需要下载一个checkpoint文件就行了。坏处在于,哪怕用户只改了某个子模型(如U-Net),为了保存整个模型,他还是得把其他子模型一起存下来。这其中存在着信息冗余,十分不灵活。Diffusers框架没有把模型全存在一个文件里,而是放到了一个文件夹里。
1 | class DDPM(pl.LightningModule): |
我们主要关注LatentDiffusion类的apply_model方法,它用于调用U-Net self.model。apply_model看上去有很长,但略过了我们用不到的一些代码后,整个方法其实非常短。一开始,方法对输入的约束信息编码cond做了一个前处理,判断约束是哪种类型。如论文里所描述的,LDM支持两种约束:将约束与输入拼接、将约束注入到交叉注意力层中。方法会根据self.model.conditioning_key是concat还是crossattn,使用不同的约束方式。Stable Diffusion使用的是后者,即self.model.conditioning_key == crossattn。做完前处理后,方法执行了x_recon = self.model(x_noisy, t, **cond)。接下来的处理交给U-Net self.model来完成。
1 | def apply_model(self, x_noisy, t, cond, return_ids=False): |
现在,我们跳转到ldm/modules/diffusionmodules/openaimodel.py的UNetModel类里。UNetModel只定义了神经网络层的运算,没有多余的功能。我们只需要看它的__init__方法和forward方法。我们先来看较为简短的forward方法。
1 | def forward(self, x, timesteps=None, context=None, y=None,**kwargs): |
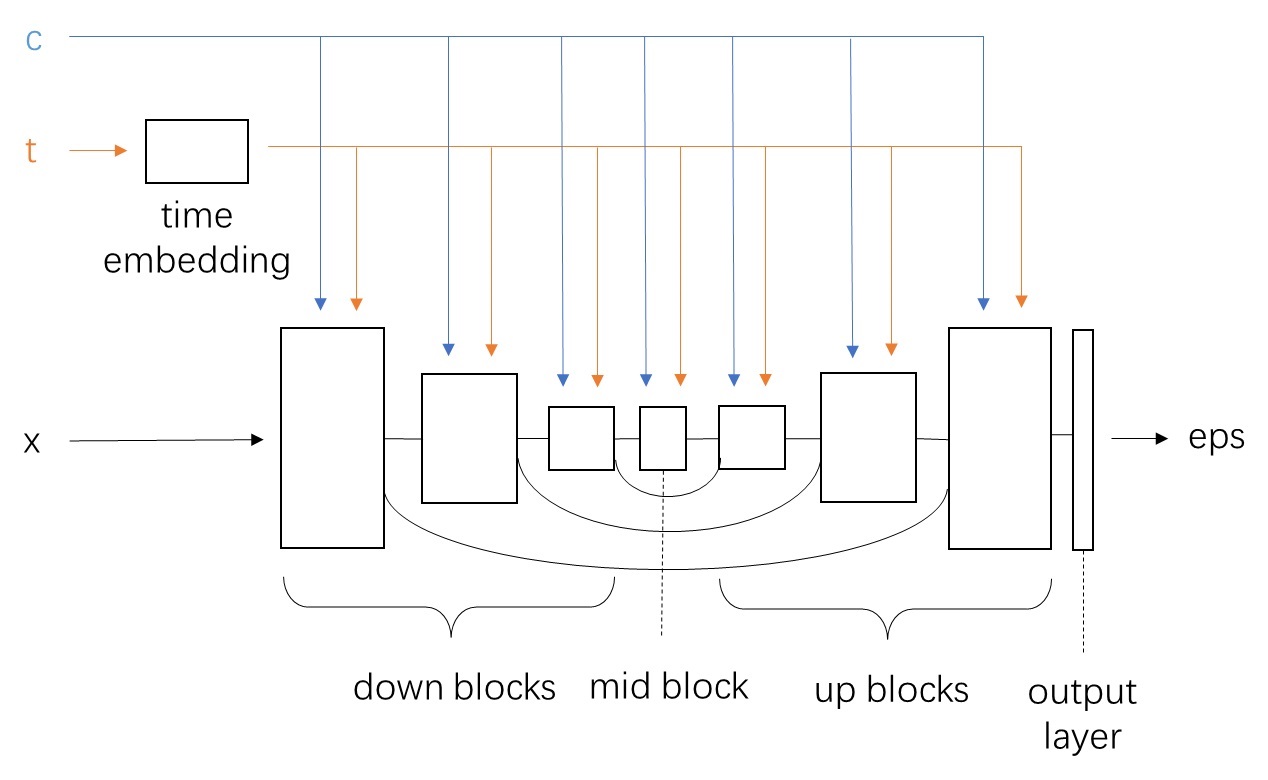
forward方法的输入是x, timesteps, context,分别表示当前去噪时刻的图片、当前时间戳、文本约束编码。根据这些输入,forward会输出当前时刻应去除的噪声eps。一开始,方法会先对timesteps使用Transformer论文中介绍的位置编码timestep_embedding,得到时间戳的编码t_emb。t_emb再经过几个线性层,得到最终的时间戳编码emb。而context已经是CLIP处理过的编码,它不需要做额外的预处理。时间戳编码emb和文本约束编码context随后会注入到U-Net的所有中间模块中。
1 | def forward(self, x, timesteps=None, context=None, y=None,**kwargs): |
经过预处理后,方法开始处理U-Net的计算。中间结果h会经过U-Net的下采样模块input_blocks,每一个子模块的临时输出都会被保存进一个栈hs里。
1 | h = x.type(self.dtype) |
接着,h会经过U-Net的中间模块。
1 | h = self.middle_block(h, emb, context) |
随后,h开始经过U-Net的上采样模块output_blocks。此时每一个编码器子模块的临时输出会从栈hs里弹出,作为对应解码器子模块的额外输入。额外输入hs.pop()会与中间结果h拼接到一起输入进子模块里。
1 | for module in self.output_blocks: |
最后,h会被输出层转换成一个通道数正确的eps张量。
1 | return self.out(h) |
这段代码的数据连接图如下所示:
在阅读__init__前,我们先看一下待会会用到的另一个模块类TimestepEmbedSequential的定义。在PyTorch中,一系列输入和输出都只有一个变量的模块在串行连接时,可以用串行模块类nn.Sequential来把多个模块合并简化成一个模块。而在扩散模型中,多数模块的输入是x, t, c三个变量,输出是一个变量。为了也能用类似的串行模块类把扩散模型的模块合并在一起,代码中包含了一个TimestepEmbedSequential类。它的行为类似于nn.Sequential,只不过它支持x, t, c的输入。forward中用到的多数模块都是通过TimestepEmbedSequential创建的。
1 | class TimestepEmbedSequential(nn.Sequential, TimestepBlock): |
看完了数据的计算过程,我们回头来看各个子模块在__init__方法中是怎么被详细定义的。__init__的主要内容如下:
1 | class UNetModel(nn.Module): |
__init__方法的代码很长。在阅读这样的代码时,我们不需要每一行都去细读,只需要理解代码能拆成几块,每一块在做什么即可。__init__方法其实就是定义了forward中用到的5个模块,我们一个一个看过去即可。
1 | class UNetModel(nn.Module): |
先来看time_embed。回忆一下,在forward里,输入的整数时间戳会被正弦编码timestep_embedding(即Transformer中的位置编码)编码成一个张量。之后,时间戳编码处理模块time_embed用于进一步提取时间戳编码的特征。从下面的代码中可知,它本质上就是一个由两个普通线性层构成的模块。
1 | self.time_embed = nn.Sequential( |
再来看U-Net最后面的输出模块out。输出模块的结构也很简单,它主要包含了一个卷积层,用于把中间变量的通道数从dims变成model_channels。
1 | self.out = nn.Sequential( |
接下来,我们把目光聚焦在U-Net的三个核心模块上:input_blocks, middle_block, output_blocks。这三个模块的组成都很类似,都用到了残差块ResBlock和注意力块。稍有不同的是,input_blocks的每一大层后面都有一个下采样模块,output_blocks的每一大层后面都有一个上采样模块。上下采样模块的结构都很常规,与经典的U-Net无异。我们把学习的重点放在残差块和注意力块上。我们先看这两个模块的内部实现细节,再来看它们是怎么拼接起来的。
Stable Diffusion的U-Net中的ResBlock和原DDPM的U-Net的ResBlock功能完全一样,都是在普通残差块的基础上,支持时间戳编码的额外输入。具体来说,普通的残差块是由两个卷积模块和一条短路连接构成的,即y = x + conv(conv(x))。如果经过两个卷积块后数据的通道数发生了变化,则要在短路连接上加一个转换通道数的卷积,即y = conv(x) + conv(conv(x))。
在这种普通残差块的基础上,扩散模型中的残差块还支持时间戳编码t的输入。为了把t和输入x的信息融合在一起,t会和经过第一个卷积后的中间结果conv(x)加在一起。可是,t的通道数和conv(x)的通道数很可能会不一样。通道数不一样的数据是不能直接加起来的。为此,每一个残差块中都有一个用于转换t通道数的线性层。这样,t和conv(x)就能相加了。整个模块的计算可以表示成y=conv(x) + conv(conv(x) + linear(t))。残差块的示意图和源代码如下:
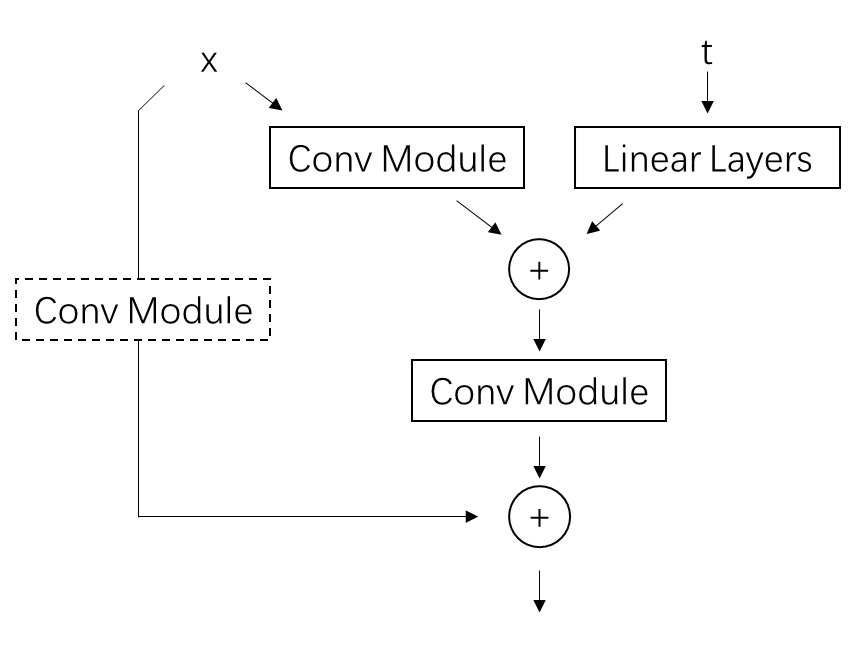
1 | class ResBlock(TimestepBlock): |
代码中的in_layers是第一个卷积模块,out_layers是第二个卷积模块。skip_connection是用于调整短路连接通道数的模块。若输入输出的通道数相同,则该模块是一个恒等函数,不对数据做任何修改。emb_layers是调整时间戳编码通道数的线性层模块。这些模块的定义都在ResBlock的__init__里。它们的结构都很常规,没有值得注意的地方。我们可以着重阅读模型的forward方法。
如前文所述,在forward中,输入x会先经过第一个卷积模块in_layers,再与经过了emb_layers调整的时间戳编码emb相加后,输入进第二个卷积模块out_layers。最后,做完计算的数据会和经过了短路连接的原输入skip_connection(x)加在一起,作为整个残差块的输出。
1 | def forward(self, x, emb): |
这里有一点实现细节需要注意。时间戳编码emb_out的形状是[n, c]。为了把它和形状为[n, c, h, w]的图片加在一起,需要把它的形状变成[n, c, 1, 1]后再相加(形状为[n, c, 1, 1]的数据在与形状为[n, c, h, w]的数据做加法时形状会被自动广播成[n, c, h, w])。在PyTorch中,x=x[..., None]可以在一个数据最后加一个长度为1的维度。比如对于形状为[n, c]的t,t[..., None]的形状就会是[n, c, 1]。
残差块的内容到此结束。我们接着来看注意力模块。在看模块的具体实现之前,我们先看一下源代码中有哪几种注意力模块。在U-Net的代码中,注意力模型是用以下代码创建的:
1 | if ds in attention_resolutions: |
第一行if ds in attention_resolutions:用于控制在U-Net的哪几个大层。Stable Diffusion每一大层都用了注意力模块,可以忽略这一行。随后,代码根据是否设置use_spatial_transformer来创建AttentionBlock或是SpatialTransformer。AttentionBlock是DDPM中采样的普通自注意力模块,而SpatialTransformer是LDM中提出的支持额外约束的标准Transfomer块。Stable Diffusion使用的是SpatialTransformer。我们就来看一看这个模块的实现细节。
如前所述,SpatialTransformer使用的是标准的Transformer块,它和Transformer中的Transformer块完全一致。输入x先经过一个自注意力层,再过一个交叉注意力层。在此期间,约束编码c会作为交叉注意力层的K, V输入进模块。最后,数据经过一个全连接层。每一层的输入都会和输出做一个残差连接。
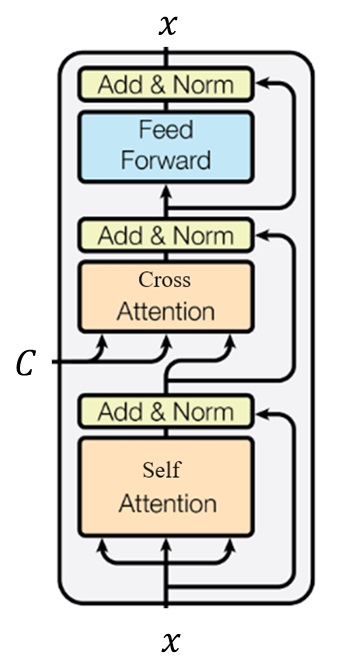
当然,标准Transformer是针对一维序列数据的。要把Transformer用到图像上,则需要把图像的宽高拼接到同一维,即对张量做形状变换n c h w -> n c (h * w)。做完这个变换后,就可以把数据直接输入进Transformer模块了。
这些图像数据与序列数据的适配都是在SpatialTransformer类里完成的。SpatialTransformer类并没有直接实现Transformer块的细节,仅仅是U-Net和Transformer块之间的一个过渡。Transformer块的实现在它的一个子模块里。我们来看它的实现代码。
SpatialTransformer有两个卷积层proj_in, proj_out,负责图像通道数与Transformer模块通道数之间的转换。SpatialTransformer的transformer_blocks才是真正的Transformer模块。
1 | class SpatialTransformer(nn.Module): |
在forward中,图像数据在进出Transformer模块前后都会做形状和通道数上的适配。运算结束后,结果和输入之间还会做一个残差连接。context就是约束信息编码,它会接入到交叉注意力层上。1
2
3
4
5
6
7
8
9
10
11
12
def forward(self, x, context=None):
    b, c, h, w = x.shape
    x_in = x
    x = self.norm(x)
    x = self.proj_in(x)
    x = rearrange(x, 'b c h w -> b (h w) c')
    for block in self.transformer_blocks:
        x = block(x, context=context)
    x = rearrange(x, 'b (h w) c -> b c h w', h=h, w=w)
    x = self.proj_out(x)
    return x + x_in
每一个Transformer模块的结构完全符合上文的示意图。如果你之前学过Transformer,那这些代码你会十分熟悉。我们快速把这部分代码浏览一遍。
1 | class BasicTransformerBlock(nn.Module): |
自注意力层和交叉注意力层都是用CrossAttention类实现的。该模块与Transformer论文中的多头注意力机制完全相同。当forward的参数context=None时,模块其实只是一个提取特征的自注意力模块;而当context为约束文本的编码时,模块就是一个根据文本约束进行运算的交叉注意力模块。该模块用不到mask,相关的代码可以忽略。
1 | class CrossAttention(nn.Module): |
Transformer块的内容到此结束。看完了SpatialTransformer和ResBlock,我们可以回头去看模块之间是怎么拼接的了。先来看U-Net的中间块。它其实就是一个ResBlock接一个SpatialTransformer再接一个ResBlock。
1 | self.middle_block = TimestepEmbedSequential( |
下采样块input_blocks和上采样块output_blocks的结构几乎一模一样,区别只在于每一大层最后是做下采样还是上采样。这里我们以下采样块为例来学习一下这两个块的结构。
1 | self.input_blocks = nn.ModuleList( |
上采样块一开始是一个调整输入图片通道数的卷积层,它的作用和self.out输出层一样。
1 | self.input_blocks = nn.ModuleList( |
之后正式进行上采样块的构造。此处代码有两层循环,外层循环表示正在构造哪一个大层,内层循环表示正在构造该大层的哪一组模块。也就是说,共有len(channel_mult)个大层,每一大层都有num_res_blocks组相同的模块。在Stable Diffusion中,channel_mult=[1, 2, 4, 4], num_res_blocks=2。
1 | for level, mult in enumerate(channel_mult): |
每一组模块由一个ResBlock和一个SpatialTransformer构成。1
2
3
4
5
6
7
8
9
10
11layers = [
ResBlock(...)
]
ch = mult * model_channels
if ds in attention_resolutions:
...
layers.append(
SpatialTransformer(...)
)
self.input_blocks.append(TimestepEmbedSequential(*layers))
...
构造完每一组模块后,若现在还没到最后一个大层,则添加一个下采样模块。Stable Diffusion有4个大层,只有运行到前3个大层时才会添加下采样模块。1
2
3
4
5
6
7
8
9
10
11
12
13
14
15for level, mult in enumerate(channel_mult):
for _ in range(num_res_blocks):
...
if level != len(channel_mult) - 1:
out_ch = ch
self.input_blocks.append(
TimestepEmbedSequential(
ResBlock(...)
if resblock_updown
else Downsample(...)
)
)
ch = out_ch
input_block_chans.append(ch)
ds *= 2
至此,我们已经学完了Stable Diffusion的U-Net的主要实现代码。让我们来总结一下。U-Net是一种先对数据做下采样,再做上采样的网络结构。为了防止信息丢失,下采样模块和对应的上采样模块之间有残差连接。下采样块、中间块、上采样块都包含了ResBlock和SpatialTransformer两种模块。ResBlock是图像网络中常使用的残差块,而SpatialTransformer是能够融合图像全局信息并融合不同模态信息的Transformer块。Stable Diffusion的U-Net的输入除了有图像外,还有时间戳t和约束编码c。t会先过几个嵌入层和线性层,再输入进每一个ResBlock中。c会直接输入到所有Transformer块的交叉注意力块中。
Diffusers
Diffusers是由Hugging Face维护的一套Diffusion框架。这个库的代码被封装进了一个Python模块里,我们可以在安装了Diffusers的Python环境中用import diffusers随时调用该库。相比之下,Diffusers的代码架构更加清楚,且各类Stable Diffusion的新技术都会及时集成进Diffusers库中。
由于我们已经在上文中学过了Stable Diffusion官方源码,在学习Diffusers代码时,我们只会大致过一过每一段代码是在做什么,而不会赘述Stable Diffusion的原理。
安装
安装该库时,不需要克隆仓库,只需要直接用pip即可。
1 | pip install --upgrade diffusers[torch] |
之后,随便在某个地方创建一个Python脚本文件,输入官方的示例项目代码。
1 | from diffusers import DiffusionPipeline |
运行代码后,”一幅毕加索风格的松鼠图片”的绘制结果会保存在output.jpg中。我得到的结果如下:
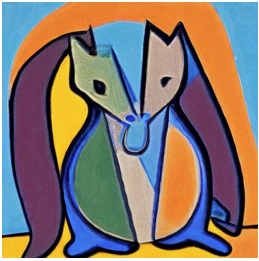
在Diffusers中,from_pretrained函数可以直接从Hugging Face的模型仓库中下载预训练模型。比如,示例代码中from_pretrained("runwayml/stable-diffusion-v1-5", ...)指的就是从模型仓库https://huggingface.co/runwayml/stable-diffusion-v1-5中获取模型。
如果在当前网络下无法从命令行中访问Hugging Face,可以先想办法在网页上访问上面的模型仓库,手动下载v1-5-pruned.ckpt。之后,克隆Diffusers的GitHub仓库,再用Diffusers的工具把Stable Diffusion模型文件转换成Diffusers支持的模型格式。
1 | git clone git@github.com:huggingface/diffusers.git |
比如,假设你的模型文件存在ckpt/v1-5-pruned.ckpt,你想把输出的Diffusers的模型文件存在ckpt/sd15,则应该输入:1
python scripts/convert_original_stable_diffusion_to_diffusers.py --checkpoint_path ckpt/v1-5-pruned.ckpt --dump_path ckpt/sd15
之后修改示例脚本中的路径,就可以成功运行了。1
2
3
4
5
6from diffusers import DiffusionPipeline
import torch
pipeline = DiffusionPipeline.from_pretrained("ckpt/sd15", torch_dtype=torch.float16)
pipeline.to("cuda")
pipeline("An image of a squirrel in Picasso style").images[0].save('output.jpg')
对于其他的原版SD checkpoint(比如在civitai上下载的),也可以用同样的方式把它们转换成Diffusers兼容的版本。
采样
Diffusers使用Pipeline来管理一类图像生成算法。和图像生成相关的模块(如U-Net,DDIM采样器)都是Pipeline的成员变量。打开Diffusers版Stable Diffusion模型的配置文件model_index.json(在 https://huggingface.co/runwayml/stable-diffusion-v1-5/blob/main/model_index.json 网页上直接访问或者在本地的模型文件夹中找到),我们能看到该模型使用的Pipeline:
1 | { |
在diffusers/pipelines/stable_diffusion/pipeline_stable_diffusion.py中,我们能找到StableDiffusionPipeline类的定义。所有Pipeline类的代码都非常长,一般我们可以忽略其他部分,只看运行方法__call__里的内容。
1 | def __call__( |
虽然这段代码很长,但代码中的关键内容和我们在本文开头写的伪代码完全一致。
1 | def ldm_text_to_image(image_shape, text, ddim_steps = 20, eta = 0) |
我们可以对照着上面的伪代码来阅读这个方法。经过Diffusers框架本身的一些前处理后,方法先获取了约束文本的编码。
1 | # 3. Encode input prompt |
方法再从采样器里获取了要用到的时间戳,并随机生成了一个初始噪声。
1 | # Preprocess |
做完准备后,方法进入去噪循环。循环一开始是用U-Net算出当前应去除的噪声noise_pred。由于加入了CFG,U-Net计算的前后有一些对数据形状处理的代码。
1 | with self.progress_bar(total=num_inference_steps) as progress_bar: |
有了应去除的噪声,方法会调用扩散模型采样器对当前的噪声图片进行更新。Diffusers把采样的逻辑全部封装进了采样器的step方法里。对于包括DDIM在内的所有采样器,都可以调用这个通用的接口,完成一步采样。eta等采样器参数会通过**extra_step_kwargs传入采样器的step方法里。
1 | # std = ddim_scheduler.get_std(t, eta) |
经过若干次循环后,我们得到了隐空间下的生成图片。我们还需要调用VAE把隐空间图片解码成普通图片。代码中的self.vae.decode(latents / self.vae.config.scaling_factor, ...)用于解码图片。
1 | if not output_type == "latent": |
就这样,我们很快就看完了Diffusers的采样代码。相比之下,Diffusers的封装确实更合理,主要的图像生成逻辑都写在Pipeline类的__call__里,剩余逻辑都封装在VAE、U-Net、采样器等各自的类里。
U-Net
接下来我们来看Diffusers中的U-Net实现。还是打开模型配置文件model_index.json,我们可以找到U-Net的类名。
1 | { |
在diffusers/models/unet_2d_condition.py文件中,我们可以找到类UNet2DConditionModel。由于Diffusers集成了非常多新特性,整个文件就像一锅大杂烩一样,掺杂着各种功能的实现代码。不过,这份U-Net的实现还是基于原版Stable Diffusion的U-Net进行开发的,原版代码的每一部分都能在这份代码里找到对应。在阅读代码时,我们可以跳过无关的功能,只看我们在Stable Diffusion官方仓库中见过的部分。
先看初始化函数的主要内容。初始化函数依然主要包括time_proj, time_embedding, down_blocks, mid_block, up_blocks, conv_in, conv_out这几个模块。
1 | class UNet2DConditionModel(ModelMixin, ConfigMixin, UNet2DConditionLoadersMixin): |
其中,较为重要的down_blocks, mid_block, up_blocks都是根据模块类名称来创建的。我们可以在Diffusers的Stable Diffusion模型文件夹的U-Net的配置文件unet/config.json中找到对应的模块类名称。
1 | { |
在diffusers/models/unet_2d_blocks.py中,我们可以找到这几个模块类的定义。和原版代码一样,这几个模块的核心组件都是残差块和Transformer块。在Diffusers中,残差块叫做ResnetBlock2D,Transformer块叫做Transformer2DModel。这几个类的执行逻辑和原版仓库的也几乎一样。比如CrossAttnDownBlock2D的定义如下:
1 | class CrossAttnDownBlock2D(nn.Module): |
接着我们来看U-Net的forward方法。忽略掉其他功能的实现,该方法的主要内容如下:1
2
3
4
5
6
7
8
9
10
11
12
13
14
15
16
17
18
19
20
21
22
23
24
25
26
27
28
29
30
31
32
33
34
35
36
37
38
39
40
41
42
43
44
45
46
47
48
49
50
51def forward(
self,
sample: torch.FloatTensor,
timestep: Union[torch.Tensor, float, int],
encoder_hidden_states: torch.Tensor,
...):
# 0. center input if necessary
if self.config.center_input_sample:
sample = 2 * sample - 1.0
# 1. time
timesteps = timestep
t_emb = self.time_proj(timesteps)
emb = self.time_embedding(t_emb, timestep_cond)
# 2. pre-process
sample = self.conv_in(sample)
# 3. down
down_block_res_samples = (sample,)
for downsample_block in self.down_blocks:
sample, res_samples = downsample_block(
hidden_states=sample,
temb=emb,
encoder_hidden_states=encoder_hidden_states,
...)
down_block_res_samples += res_samples
# 4. mid
sample = self.mid_block(
sample,
emb,
encoder_hidden_states=encoder_hidden_states,
...)
# 5. up
for i, upsample_block in enumerate(self.up_blocks):
res_samples = down_block_res_samples[-len(upsample_block.resnets) :]
down_block_res_samples = down_block_res_samples[: -len(upsample_block.resnets)]
sample = upsample_block(
hidden_states=sample,
temb=emb,
res_hidden_states_tuple=res_samples,
encoder_hidden_states=encoder_hidden_states,
...)
# 6. post-process
sample = self.conv_out(sample)
return UNet2DConditionOutput(sample=sample)
该方法和原版仓库的实现差不多,唯一要注意的是栈相关的实现。在方法的下采样计算中,每个downsample_block会返回多个残差输出的元组res_samples,该元组会拼接到栈down_block_res_samples的栈顶。在上采样计算中,代码会根据当前的模块个数,从栈顶一次取出len(upsample_block.resnets)个残差输出。
1 | down_block_res_samples = (sample,) |
现在,我们已经看完了Diffusers中U-Net的主要内容。可以看出,Diffusers的U-Net包含了很多功能,一般情况下是难以自己更改这些代码的。有没有什么办法能方便地修改U-Net的实现呢?由于很多工作都需要修改U-Net的Attention,Diffusers给U-Net添加了几个方法,用于精确地修改每一个Attention模块的实现。我们来学习一个修改Attention模块的示例。
U-Net类的attn_processors属性会返回一个词典,它的key是每个Attention运算类所在位置,比如down_blocks.0.attentions.0.transformer_blocks.0.attn1.processor,它的value是每个Attention运算类的实例。默认情况下,每个Attention运算类都是AttnProcessor,它的实现在diffusers/models/attention_processor.py文件中。
为了修改Attention运算的实现,我们需要构建一个格式一样的词典attn_processor_dict,再调用unet.set_attn_processor(attn_processor_dict),取代原来的attn_processors。假如我们自己实现了另一个Attention运算类MyAttnProcessor,我们可以编写下面的代码来修改Attention的实现:
1 |
|
MyAttnProcessor的唯一要求是,它需要实现一个__call__方法,且方法参数与AttnProcessor的一致。除此之外,我们可以自由地实现Attention处理的细节。一般来说,我们可以先把原来AttnProcessor的实现代码复制过去,再对某些细节做修改。
总结
在这篇文章中,我们学习了Stable Diffusion的原版实现和Diffusers实现的主要内容:采样算法和U-Net。具体来说,在原版仓库中,采样的实现一部分在主函数中,一部分在DDIM采样器类中。U-Net由一个简明的PyTorch模块类实现,其中比较重要的子模块是残差块和Transformer块。相比之下,Diffusers实现的封装更好,功能更多。Diffusers用一个Pipeline类来维护采样过程。Diffusers的U-Net实现与原版完全相同,且支持更复杂的功能。此外,Diffusers还给U-Net提供了精确修改Attention计算的接口。
不管是哪个Stable Diffusion的框架,都会提供一些相同的原子操作。各种基于Stable Diffusion的应用都应该基于这些原子操作开发,而无需修改这些操作的细节。在学习时,我们应该注意这些操作在不同的框架下的写法是怎么样的。常用的原子操作包括:
- VAE的解码和编码
- 文本编码器(CLIP)的编码
- 用U-Net预测当前图像应去除的噪声
- 用采样器计算下一去噪迭代的图像
在原版仓库中,相关的实现代码如下:
1 | # VAE的解码和编码 |
在Diffusers中,相关的实现代码如下:1
2
3
4
5
6
7
8
9
10
11
12# VAE的解码和编码
image = self.vae.decode(latents / self.vae.config.scaling_factor, return_dict=False)[0]
latents = self.vae.encode(image).latent_dist.sample(generator) * self.vae.config.scaling_factor
# 文本编码器(CLIP)的编码
self.encode_prompt(...)
# 用U-Net预测当前图像应去除的噪声
self.unet(..., return_dict=False)[0]
# 用采样器计算下一去噪迭代的图像
self.scheduler.step(..., return_dict=False)[0]
如今zero-shot(无需训练)的Stable Diffusion编辑技术一般只会修改采样算法和Attention计算,需训练的编辑技术有时会在U-Net里加几个模块。只要我们熟悉了普通的Stable Diffusion是怎么样生成图像的,知道原来U-Net的结构是怎么样的,我们在阅读新论文的源码时就可以把这份代码与原来的代码进行对比,只看那些有修改的部分。相信读完了本文后,我们不仅加深了对Stable Diffusion本身的理解,以后学习各种新出的Stable Diffusion编辑技术时也会更加轻松。